I have been asked several times how to transfer images at high resolution between mobile devices and/or a desktop/laptop computer. There are several ways to do this from one image to the entire camera roll on your iPhone or iPad. Although not the way I would transfer my entire camera roll it is a practical way to move an image you might want to begin processing on your mobile device. First of all you need to purchase the PHOTO TRANSFER APP from the App Store.
1. Open transfer and choose SEND or RECEIVE. I chose RECEIVE for this tutorial.
2, The pick which device you want to transfer from. I chose APPLE COMPUTER. Transfer then gives you a type link and an IP address. There are times when one would work better then the other.

YOU ARE NOW READY TO GO TO THE LAPTOP OR DESKTOP TO FINISH THE TRANSFER.
5. Type the address of choice into your browser - I usually use Safari - it seems to work better - but there are times when I use Firefox if Safari is not working.
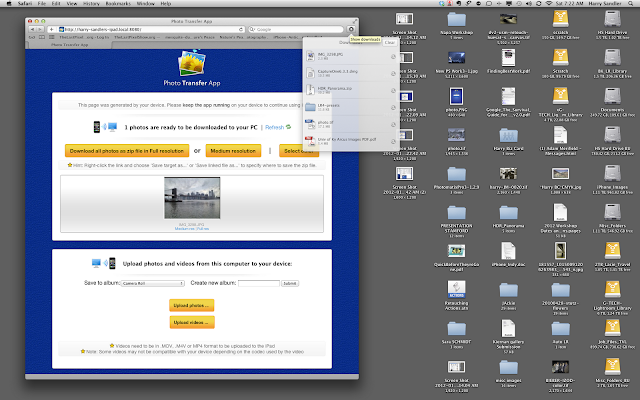
6. You will then get the window below asking about resolution and also which folder you might want to put the image in. The resolution choices are high and medium - always choose high..The lower dialog box on this screen is for transferring/uploading images from the computer to the mobile device but this is for another tutorial. Hard to see but this dialog also gives the choice of folder for storage - also allows the creation of a new folder should that be your goal. NOTE: No matter what folder you choose there is always a copy in your CAMERA ROLL.
7, In my mac a window a dialog appears with a magnifying glass (upper right) which allows me to navigate to the image or images just downloaded.
That's all for today folks...Email with any questions.
The Last-Pixel Show teaches location iPhone/iPad workshops. Go to our website for more information.
1. Open transfer and choose SEND or RECEIVE. I chose RECEIVE for this tutorial.
2, The pick which device you want to transfer from. I chose APPLE COMPUTER. Transfer then gives you a type link and an IP address. There are times when one would work better then the other.
Below is the dialog with the IP and web addresses......
YOU ARE NOW READY TO GO TO THE LAPTOP OR DESKTOP TO FINISH THE TRANSFER.
5. Type the address of choice into your browser - I usually use Safari - it seems to work better - but there are times when I use Firefox if Safari is not working.
6. You will then get the window below asking about resolution and also which folder you might want to put the image in. The resolution choices are high and medium - always choose high..The lower dialog box on this screen is for transferring/uploading images from the computer to the mobile device but this is for another tutorial. Hard to see but this dialog also gives the choice of folder for storage - also allows the creation of a new folder should that be your goal. NOTE: No matter what folder you choose there is always a copy in your CAMERA ROLL.
7, In my mac a window a dialog appears with a magnifying glass (upper right) which allows me to navigate to the image or images just downloaded.
That's all for today folks...Email with any questions.
The Last-Pixel Show teaches location iPhone/iPad workshops. Go to our website for more information.


No comments:
Post a Comment