 |
| Bryant Park - New York City - Ice Skating |

Saturday, November 26, 2011
Bryant Park, New York City

Friday, November 25, 2011
Photo Studio for the Mac/iPad/iPhone
 |
| Photo Studio Weekend Discounts |
lick here for more information.
Sunday, November 20, 2011
Filter Mania

Saturday, November 19, 2011
Whidbey Island, Photo Forge
 |
| Whidbey Island Lighthouse |
1, Once your image is loaded hit the funnel (yes the funnel) which will expose the Unsharp Mask icon.
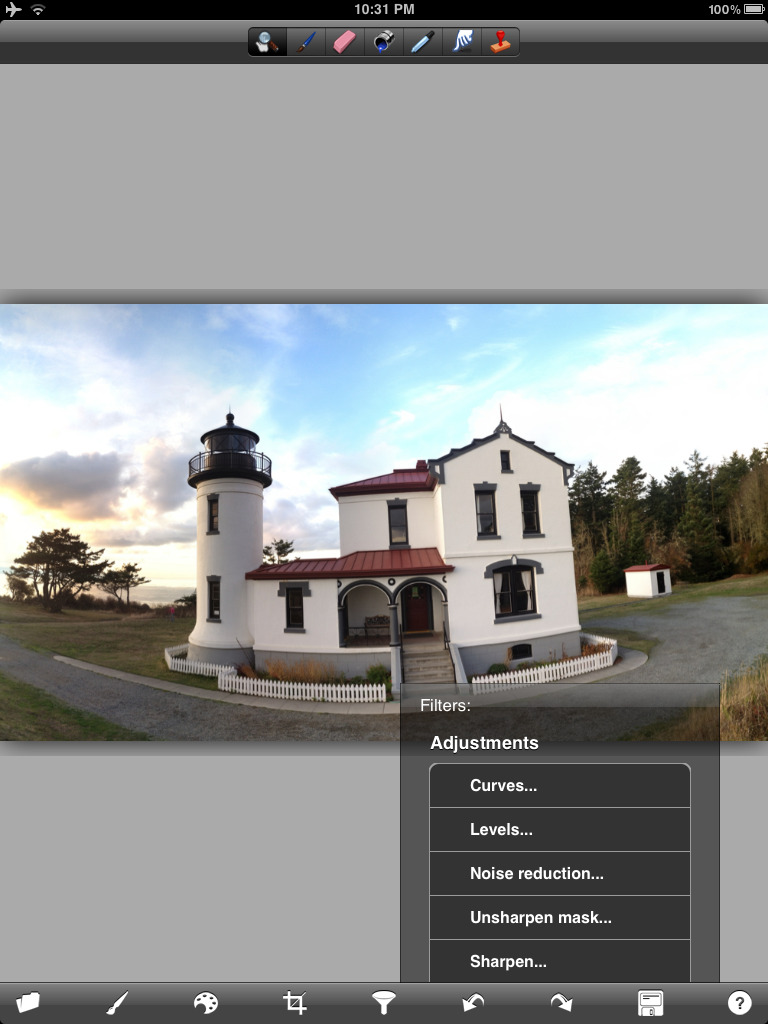
2. Tap the unsharp mask icon to reveal the USM dialog:
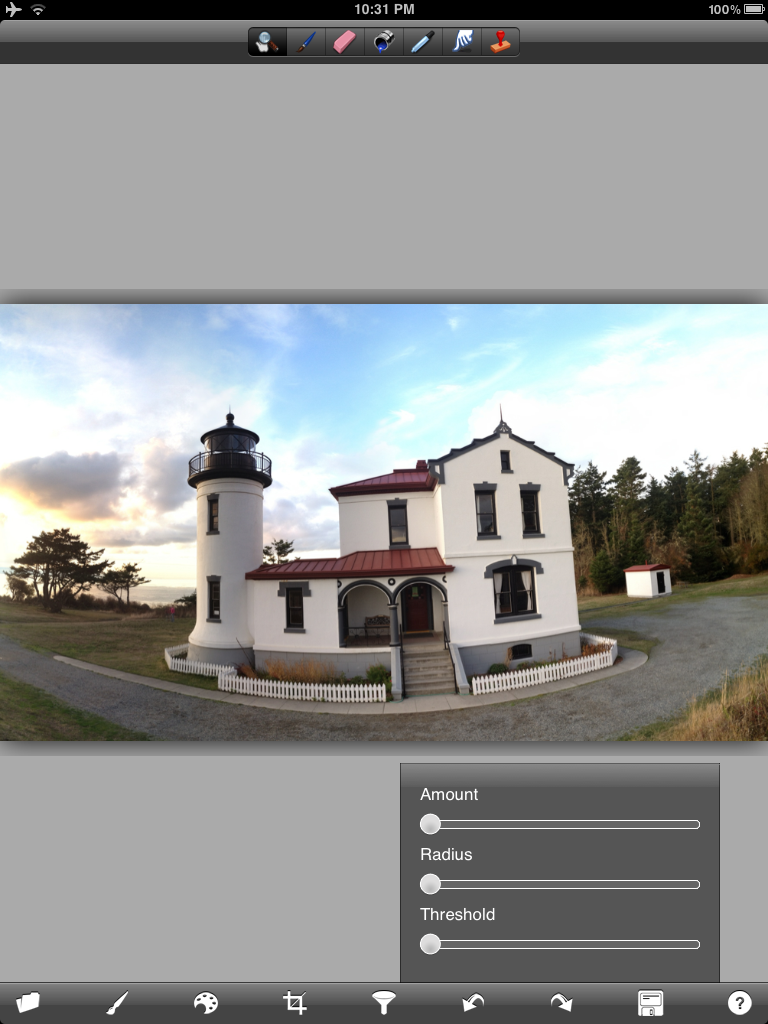
3. There are several ways to use this USM. You can run the amount all the way up and then use the radius to your liking or you can do the reverse - radius up and amount down. They will effect the image in different ways - this is actually a sharpening method that comes from using phototshop and you should navigate your own way to what you might like. Lately I have changed to using the set-up below. When this was first introduced there were very few choices as to how to get this look - now there are several new apps that do a better job - but start here and play a bit.

4. The alternative way using forge is to just use the sharpen slider - USM if not done correctly will add artifacts into the image and depending on the image sharpen works just as well. I usualy start with the strength below.....

5. Once sharpened navigate (scroll down) and find the oil painting and watercolor sliders. You can use one or both - yo can use one - resharpen and then use the other - it is all trail and error depending on the look you are after. As Teri Lou says PLAY PLAY PLAY

6. At 100% opacity the image will look something like this:

7. Adjust the slider to your taste.....

8. A combo of both watercolor and oil paint.....

9. Combo with adjusted opacity....

10. My starting point for the image above.....

At this point it is completely up to your creativity as to what happens next. I always like to have some clarity in the image so the subject stands out....I use Dynamic Light, Filterstorm, Snapseed and Blender to work up the final look. I even used Iris on the image posted today....
Take a Last-Pixel Show Workshop and learn more creative choices for your iPhone imagery - not to mention printing techniques and much more....If you can't make a workshop then take one of Teri Lou's online courses - they are perfect for learning basics and much more....
Friday, November 18, 2011
The Last-Pixel Show, Printing iPhone Photography Images
The last day of a Last-Pixel Show workshop is usually spent preparing the student images for print and then actually printing. This involves scaling, retouching artifacts and finally print sharpening. The images are printed using on Epson Ultra Smooth Fine Art (matte) or Museo Silver Rag papers (lustre) - they are printed on Epson pitners using the Photoshop and/or Lightroom dialog.
Take a Last-Pixel Show workshop and learn how to maintain the quality and resolution of your images during processing to ensure the highest quality print possible.
Here are a few of the image from the Whidbey Island Workshop (in alphabetical order):
Take a Last-Pixel Show workshop and learn how to maintain the quality and resolution of your images during processing to ensure the highest quality print possible.
Here are a few of the image from the Whidbey Island Workshop (in alphabetical order):
 |
| Kathleen Brennan |
 |
| Cecily Batey Caceu |
 |
| Marcia Duff |
 |
| Bruce Metcalf |
Wednesday, November 16, 2011
Caddo Lake - Sunrise

Tuesday, November 15, 2011
Coney Island Pier
 |
| Coney Island, Pier |
Learn something new, go back and re-process - you never know what will happen.
The original image was made with ProHDR, Filterstorm, Dynamic Light, Rays and Photoforge.
Monday, November 14, 2011
Suzy Hotrod, Roller Derby and the iPad
 |
| Suzy Hotrod - Gotham Girls - New York |
The only application I used was 'Metal Me HD' - not sure how I found this one but thought it might must work for this type of image - Note this is a low res application but I managed to keep it at 3.5MP at the end with various blending techniques...My feeling is that this application is worth a look...
PS: I blended Suzy back in using Filterstorm...
The Last-Pixel Show will be teaching this technique in the upcoming workshop in Carmel, Indiana.... click here for more information.
Sunday, November 13, 2011
Grain
 |
| Original ProHDR Image |
What I first noticed was the addition of filter choices - seems like every application is starting to offer this feature. I just happened to be in the second oldest city in Denver, Georgetown, and decided to try the vintage filter while shooting the Georgetown Museum.
In addition to the color Pro added some grain - seemingly to enhance the vintage look and feel. Honestly, I never noticed the grain addition (using the iphone not the ipad) until it was mentioned on a facebook page I participate in. After getting a closer look on the iPad I found the grain to not be to my liking and decided to run a few test on other applications that had 'grain' as a processing choice. Admittedly I did not try all the options, instead opting for my own application preferences.
MONOPHIX:
 | ||
| MonoPhix Version |

MonoPhix Noise Grain Generator for amount of grain

SIMPLY BLACK AND WHITE: Dialog for grain....

PHOTO WIZARD: After importing your image choose the FX icon at the top of the screen. On the right you will find both the 'GRAY PRESETS' (for Silver) and the 'ADD NOISE' ' icon for the grain.

Photo Wizard - Choose Silver under the ''GRAY PRESET' Icon

Photo Wizard - Adjust the grain/noise under the 'ADD NOISE' icon

I would welcome any feedback or experience you might have had in the search for the perfect 'GRAIN'....
Sunday, November 6, 2011
Deception Pass
 |
| Deception Pass - Whidbey Island |
Last evening shoot for the last- pixel show workshop on Whidbey Island. We went to Deception Pass to catch the sunset.....this image from just before the sky turned red and orange....
Subscribe to:
Posts (Atom)