 |
| Convergence, iPhone5 |

Showing posts with label blender. Show all posts
Showing posts with label blender. Show all posts
Saturday, December 15, 2012
Ferris Wheel, Burka
Monday, November 19, 2012
Waiting for Coffee....
 |
| Waiting for Coffee.... |
Thursday, October 18, 2012
Cara
 |
| Cara, iPhone4s |
Tuesday, October 9, 2012
Koi Pond - Asia
 |
| Koi Pond -= Bali |
Saturday, September 22, 2012
Bal,Fishing Boat
 |
| Fishing Boat, Bali |
I was out as sunrise this particular morning but did manage to catch one boat coming in a bit early....Actually got to watch them pull the boat up the rocky coast onto dry land.....
This image was made using the Olympus 4/3 OM-D and process on the iPad and CS6.
Monday, September 10, 2012
Apple iPad and Olympus OM-D
 | |
| The Palouse, 4/3 OM-D image |
Thursday, August 23, 2012
Lone Tree, The Palouse
 |
| Lone Tree, The Palouse |
We made images of o0ld cars, tractors, trucks, combines, wheat, lentils, and, of course, Lone Tree's....Seems like everyone has a special Lone Tree.......
On that note I processed my own version of The Lone Tree above...Used 645Pro, Snapseed, blender and foolproof.....Foolproof is a low res app but neat look for blending back into an original..
Sunday, January 22, 2012
Ireland, Pink Bridge, Londonderry

So much for posting every other day.....on a roll this last week....
This image from Ireland a few weeks back - was out in back of our hotel in Londonderry. I was blessed with a brief moment of sunshine before it started raining again.....
Image made with my iPhone4s, tripod, truehdr, 6 image stitch in Autostitch. Local adjustments in Filterstorm, blender and photo FX Ultra. As developers are making more and more applications available for the Mac the image was further adjusted in Photoshop CS5 - Something I am exploring on a daily basis...
GO GIANTS....
Wednesday, December 21, 2011

Friday, December 2, 2011
Fairy Tale Field
 |
| Fairy Tale Field |
But well worth the effort in the 32 degree weather.
Saturday, November 19, 2011
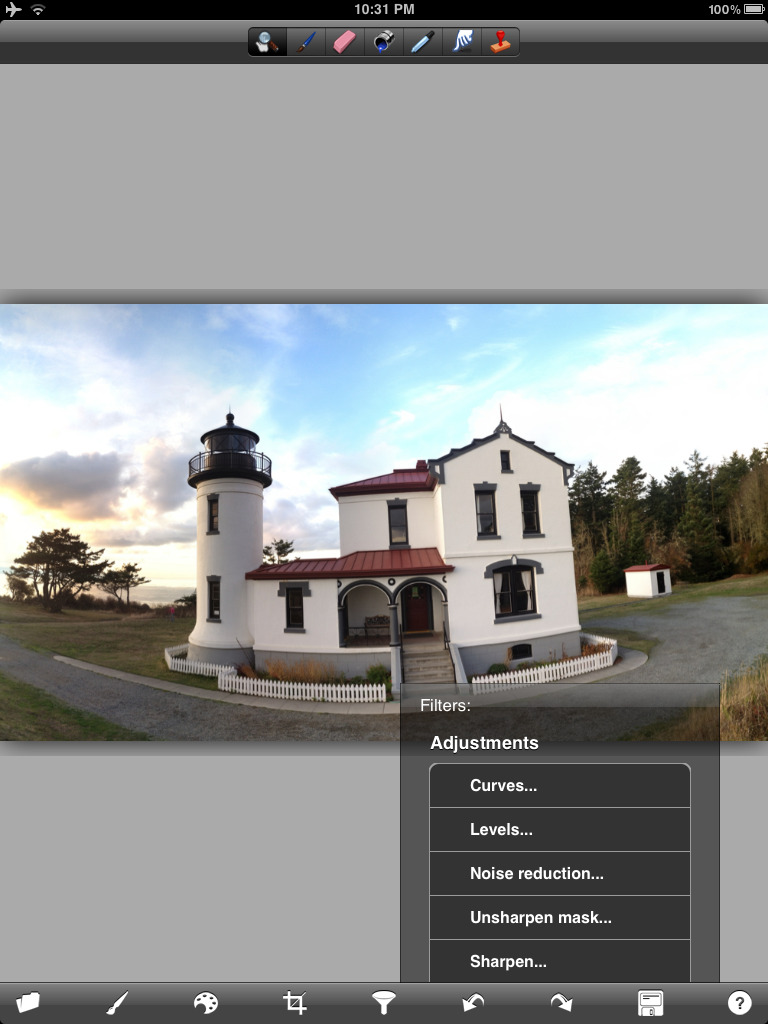
Whidbey Island, Photo Forge
 |
| Whidbey Island Lighthouse |
1, Once your image is loaded hit the funnel (yes the funnel) which will expose the Unsharp Mask icon.
2. Tap the unsharp mask icon to reveal the USM dialog:
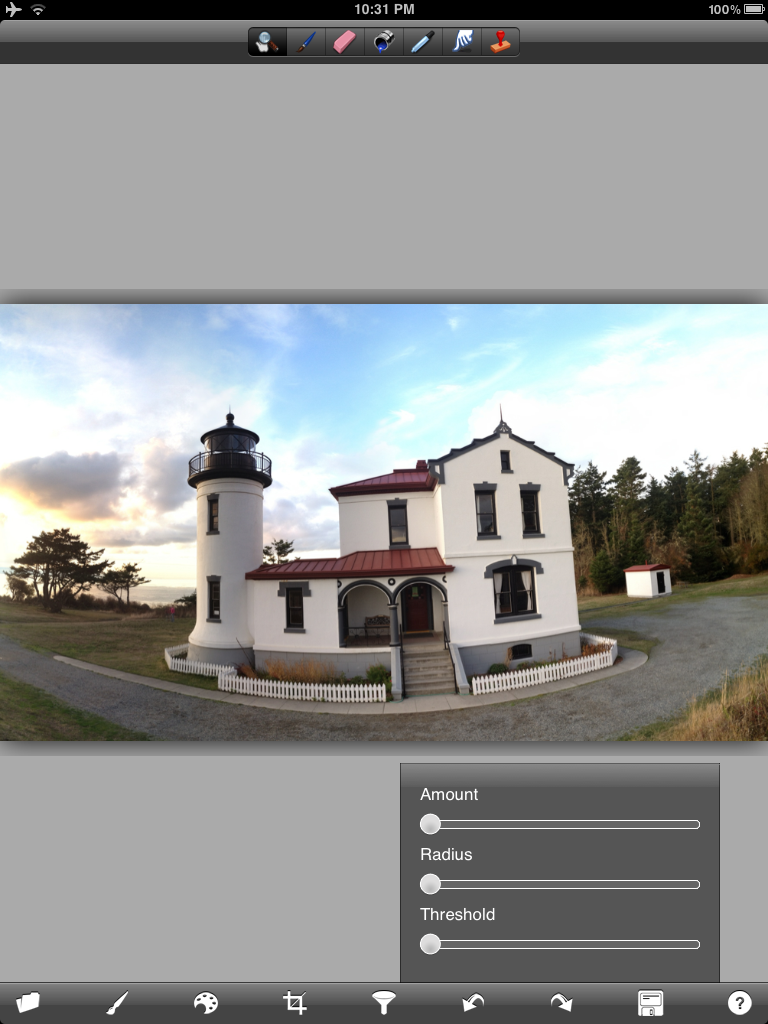
3. There are several ways to use this USM. You can run the amount all the way up and then use the radius to your liking or you can do the reverse - radius up and amount down. They will effect the image in different ways - this is actually a sharpening method that comes from using phototshop and you should navigate your own way to what you might like. Lately I have changed to using the set-up below. When this was first introduced there were very few choices as to how to get this look - now there are several new apps that do a better job - but start here and play a bit.

4. The alternative way using forge is to just use the sharpen slider - USM if not done correctly will add artifacts into the image and depending on the image sharpen works just as well. I usualy start with the strength below.....

5. Once sharpened navigate (scroll down) and find the oil painting and watercolor sliders. You can use one or both - yo can use one - resharpen and then use the other - it is all trail and error depending on the look you are after. As Teri Lou says PLAY PLAY PLAY

6. At 100% opacity the image will look something like this:

7. Adjust the slider to your taste.....

8. A combo of both watercolor and oil paint.....

9. Combo with adjusted opacity....

10. My starting point for the image above.....

At this point it is completely up to your creativity as to what happens next. I always like to have some clarity in the image so the subject stands out....I use Dynamic Light, Filterstorm, Snapseed and Blender to work up the final look. I even used Iris on the image posted today....
Take a Last-Pixel Show Workshop and learn more creative choices for your iPhone imagery - not to mention printing techniques and much more....If you can't make a workshop then take one of Teri Lou's online courses - they are perfect for learning basics and much more....
Friday, October 28, 2011
Las Vegas Morning
 |
| Las Vegas Morning |
Tuesday, October 18, 2011
Ireland - Ring of Kerry
 |
| Ireland iPhone4 |
As I just got my new iPhone 4s this will be an interesting trip doing the test drive...looking forward to seeing old friends and making some power stitches with the new high res camera......
I can not remember very much about today's image other then it was in Ireland on the Ring of Kerry....most likely a pro-hdr image.....I processed in Filterstorm and blender this morning on the iPad2.....
stay tuned to this space for some travel images.......what fun...
Thursday, September 29, 2011
Indianapolis - The Pyramids
The Pyramids are an Indianapolis Landmark and world-class office park located on the north side of the city. When I stopped by to see these structures a few weeks back it was overcast and raining - made one or two images and never gave it another though until last night....
I was in the man-cave watching the end of the baseball season wondering who the Yankees would be playing on Friday - and it is Detroit...no Red Sox Nation this year - how strange....the curse is back....but I digress...
I started playing with the original image at the top of this page in various color applications such as Filterstorm, Color Cross, color claw and color leap...then did some blending and color control in Filterstorm and Blender - lots of opacity brushing and masking was involved - the various results of which are posted today.

So many variations on the theme.....
Leaving for Indiana again on Sunday - moving my Music, iPhone and Other Neighborhoods show to Toledo for the 1Matters.org benefit. Prints from this show are also available on the 'print sales' page which is live on my website, HarrySandler.com.
 | |
| Original |
I started playing with the original image at the top of this page in various color applications such as Filterstorm, Color Cross, color claw and color leap...then did some blending and color control in Filterstorm and Blender - lots of opacity brushing and masking was involved - the various results of which are posted today.

So many variations on the theme.....
 |
| Toon Paint Blend |
Tuesday, September 20, 2011
Pencil Paint 2 Workflow

Import the original into Photo Studio HD and choose Pencil Paint 2 - used the settings below:

Image after saving out of Photo Studio HD

Took the original and Photo Studip Pencil Paint 2 version and used Blender in the 'Plus Lighter' Blending Mode to create the image below.........

Put the Blender version into Filterstorm - added expposure using the original image and locally painted back in the details I wanted in the final image.....

Took the final image into Grungetastic and created a frame - 4th down on the right

Final Image with frame added....

Wednesday, September 14, 2011
Creating Textures with Artista Haiku
iPhone tip 102: Creating textures in Photo Artista Haiku...............
1. Import an image into Artista Haiku: I started with hispstamatic image of graffiti:

2. Pick a style under icon 1: my choice was Abstract 1.....

3. Play with the sliders under icon 2 : my settings below......


4. Add a texture under icon 3: totally subjective.....try a few - you can also save and continue to stack background textures to taste.....

I then blended this using the application Blender in the OVERLAY mode....note that the most textures show through the lighter areas which is indicative of this blending mode......You can see the texture showing through the headlights......

You can also take an image you like - create a halftone type texture - then place the original image back on top as a separate layer - I will show you this tomorrow if I survive the party I am going to tonight......
Remember to save your texture as a preset......
The way that layers interact with other layers in the layer stack is determined by blending mode of the upper layer - more on this tomorrow....
1. Import an image into Artista Haiku: I started with hispstamatic image of graffiti:

2. Pick a style under icon 1: my choice was Abstract 1.....

3. Play with the sliders under icon 2 : my settings below......

Image after applying the settings above........

4. Add a texture under icon 3: totally subjective.....try a few - you can also save and continue to stack background textures to taste.....

I then blended this using the application Blender in the OVERLAY mode....note that the most textures show through the lighter areas which is indicative of this blending mode......You can see the texture showing through the headlights......

You can also take an image you like - create a halftone type texture - then place the original image back on top as a separate layer - I will show you this tomorrow if I survive the party I am going to tonight......
Remember to save your texture as a preset......
The way that layers interact with other layers in the layer stack is determined by blending mode of the upper layer - more on this tomorrow....
Thursday, September 8, 2011
Whoops
 |
| Saturn 6, Coney Island |
 |
| Coney Island |
 |
| Carousel, Coney Island |
Tuesday, August 2, 2011
Jokulsarion Glacier - Iceland
 |
| Deep in the heart..... |
blog: http://hsandler.blogspot.com
Website: http://harrysandler.com
Sunday, July 31, 2011
Iceland - Small Cottage
 |
| Iceland, Svinafell, Cottage |
According to an online source Svinafell, during the early settlements of Iceland, was considered a place of great nobility...apparently Svinafell has been around since the 9th or 10th century - located near the Oraefajokull Glacier, one of the most active volcanoes in Iceland....
For applications used see labels below....additionally I used blender to add two textures to this image.
Saturday, July 30, 2011
Iceland - Kirkjufjara
 |
| Kirkjufjara - Iceland |
The last stop we made was at Kirkjufjara which is a mix of black beach, wonderful rock formations and the ocean. As we pulled in I noticed this magnificent rock over to my left and decided that was my destination.... it worked out really well...this image is one of my top three from the trip...Today I am posting the iPhone version with the big boy image at a later date.....
This was processed with the help of a friend - Teri Lou Dantzler - who is fast becoming one of the premier iPhoneographers in the United States - and Iceland of course....
Subscribe to:
Posts (Atom)